


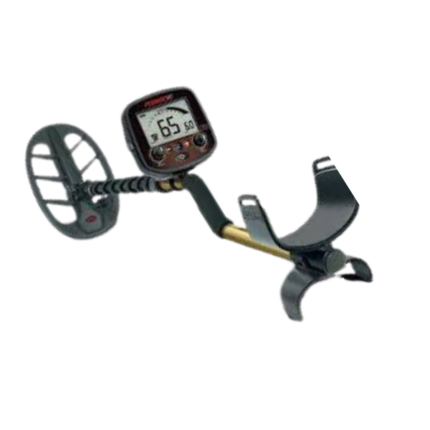
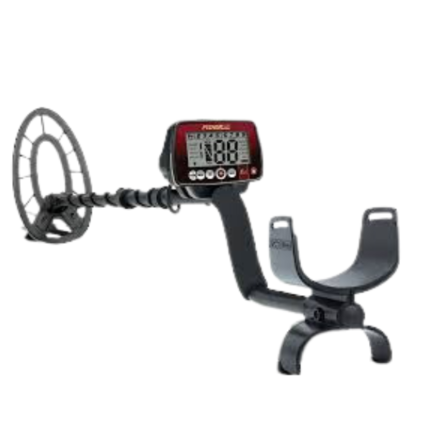
Fisher Gold Bug Pro Metal Detector: A Comprehensive Guide
The Fisher Gold Bug Pro Metal Detector is a top-tier device designed specifically. For gold prospecting, making it a popular choice among treasure hunters and hobbyists. Known for its high sensitivity to small gold nuggets, the Gold Bug Pro offers a blend of advanced features and user-friendly design. This guide will provide an easy-to-read overview of the Gold Bug Pro. Covering its key features, technical specifications, and practical tips on how to use it effectively.
Key Features of the Fisher Gold Bug Pro
High-Frequency Operation for Gold Detection
The Fisher Gold Bug Pro operates at a high frequency of 19 kHz, making it exceptionally sensitive to small gold nuggets. This high frequency is crucial for detecting tiny gold particles. That lower-frequency detectors might miss. Whether you’re searching in mineral-rich environments or areas with fine gold deposits. The Gold Bug Pro excels in delivering accurate results.
Dual-Mode Operation: All-Metal and Discrimination
The Gold Bug Pro offers two primary modes of operation: All-Metal Mode and Discrimination Mode.
-
All-Metal Mode: This mode provides the highest sensitivity and depth, allowing the detector to pick up all types of metals. It’s particularly useful when you want to ensure you don’t miss any potential targets, including small gold nuggets.
-
Discrimination Mode:. This mode lets you filter out unwanted targets, such as iron or trash, by setting the detector to ignore specific types of metals. This feature is especially helpful in areas with a lot of metal debris, allowing you to focus on finding valuable targets like gold, silver, or coins.
Ground Balance for Varied Terrains
The Fisher Gold Bug Pro is equipped with both automatic and manual ground balancing capabilities. Ground balancing is essential when detecting in areas with high mineral content. As it helps eliminate false signals caused by the ground itself. The automatic ground balance feature is user-friendly for beginners. While the manual option gives more control to experienced. Users who want to fine-tune the detector’s settings for specific ground conditions.
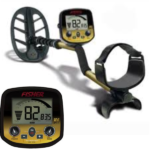
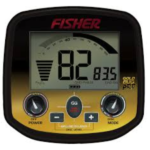
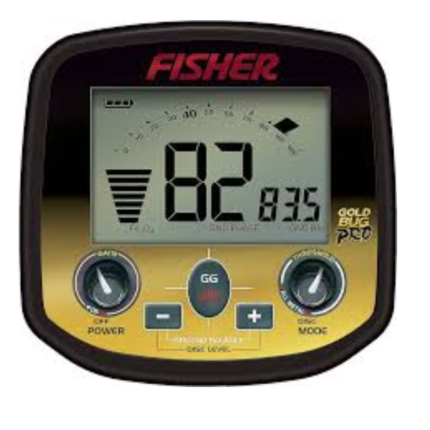
Visual Target ID and Depth Indicator
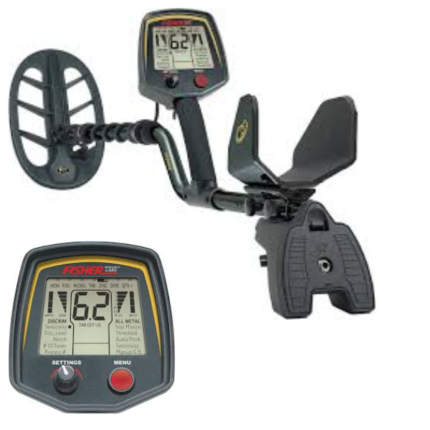
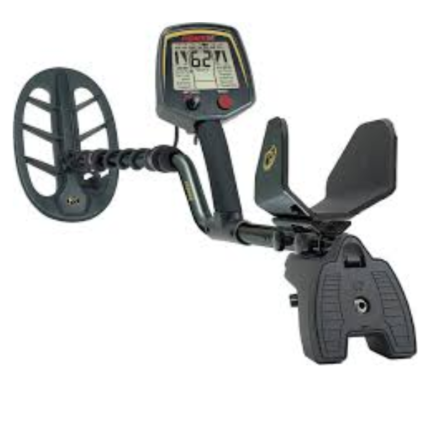
The Gold Bug Pro features a large, backlit LCD screen that provides essential information at a glance. The screen displays a Target ID ranging from 0 to 99, helping you identify the type of metal detected. For example, higher numbers often indicate more conductive metals like silver. While lower numbers suggest iron or other less conductive materials. Additionally, the display includes a depth indicator that estimates how deep the detected target is. Allowing you to decide whether it’s worth digging.
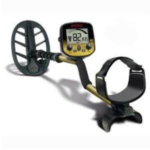
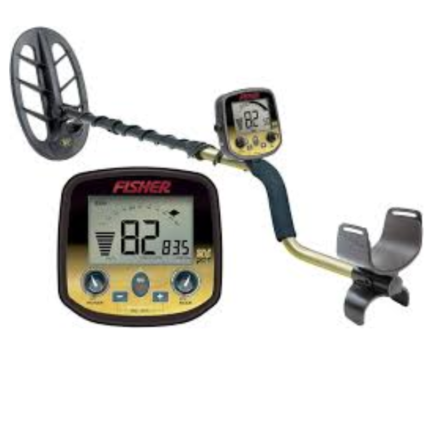
Lightweight and Ergonomic Design
Weighing only 2.5 pounds (1.13 kg), the Gold Bug Pro is designed for comfort and ease of use. Its lightweight and ergonomic build makes it ideal for extended detecting. Sessions without causing fatigue. The detector features an adjustable armrest and padded handle. Ensuring a comfortable grip even during prolonged use. The compact and portable design also makes it easy to transport, whether you’re hiking to a remote location or exploring a large field.
Pinpoint Mode for Precision
The Gold Bug Pro includes a pinpoint mode that helps you accurately locate the exact position of a target. This feature is particularly useful once you’ve. Identified a potential target and want to minimize the amount of digging required. By switching to pinpoint mode, you can narrow down the target’s location, making retrieval quicker and more efficient.
Technical Specifications
-
Operating Frequency: 19 kHz
-
Sensitivity: High sensitivity to small gold nuggets
-
Discrimination: Adjustable discrimination with visual target ID
-
Ground Balance: Manual and automatic ground balancing
-
Audio Output: Built-in speaker and 1/4″ headphone jack
-
Power Source: Single 9-volt battery (provides approximately 15-20 hours of use)
-
Weight: 2.5 pounds (1.13 kg)
-
Search Coil: 5″ Double-D waterproof coil
-
Warranty: 5 years
How to Use the Fisher Gold Bug Pro
Assembly and Setup
-
Assemble the Detector: Attach the 5″ Double-D search coil to the lower shaft. Secure the coil cable around the shaft, ensuring it’s tightly wound to prevent tangling or damage.
-
Install the Battery: Open the battery compartment located on the control box and insert a 9-volt battery. Ensure the battery is properly seated, then close the compartment securely.
-
Power On the Detector: Turn on the detector by pressing the power button. The LCD screen will light up, indicating that the device is operational.
-
Adjust Ground Balance: For beginners, use the automatic ground balance feature. If you’re more experienced, you can manually adjust the ground balance to suit the specific ground conditions you are detecting in.
-
Select Operating Mode:. Choose between All-Metal Mode for maximum depth and sensitivity. Or Discrimination Mode to filter out unwanted metals. Adjust the discrimination settings based on the type of targets you’re interested in finding.
Tips for Effective Use
-
Proper Sweep Technique: Move the search coil slowly and steadily across the ground, keeping it parallel to the surface. Avoid lifting the coil at the end of each sweep to maintain consistent depth detection.
-
Understanding Target ID: Pay attention to the Target ID numbers displayed on the screen. Higher numbers typically indicate more valuable metals. While lower numbers might suggest less valuable targets like iron.
-
Use Pinpoint Mode: Once you detect a target, switch to pinpoint mode to accurately locate the target’s position. This reduces unnecessary digging and helps you recover targets more efficiently.
-
Adjust for Ground Conditions:. If you’re detecting in an area with highly mineralized soil. Adjust the ground balance accordingly to minimize false signals. The automatic ground balance feature is convenient. But manual adjustment may offer better results in challenging conditions.
-
Listening to Audio Tones: The Gold Bug Pro emits different tones based on the type of metal detected. Familiarize yourself with these tones to better identify. Targets without constantly relying on the visual display.
Maintenance and Care
Cleaning the Detector
After each use, wipe down the search coil and control box with a soft, damp cloth. Avoid using harsh chemicals, as they can damage the detector’s components. If the coil gets particularly dirty, rinse it with water and dry it thoroughly before storing it.
Battery Care
Remove the battery if the detector won’t be used for an extended period to prevent battery corrosion. This ensures that your detector is ready to go when you need it next.
Regular Inspections
Check the coil cable and connections for any signs of wear or damage. Ensure that all parts are securely attached and functioning correctly. Address any issues promptly to maintain the detector’s performance.
Conclusion
The Fisher Gold Bug Pro Metal Detector is a powerful and versatile tool designed to help you find gold and other valuable metals with ease. Its high sensitivity, advanced ground balancing features, and user-friendly. Design make it an excellent choice for both beginners and experienced treasure hunters. By following the tips and guidelines in this guide, you can maximize the performance of your. Gold Bug Pro and increase your chances of discovering hidden treasures. Whether you’re searching for gold in mineral-rich environments or exploring new areas. The Fisher Gold Bug Pro is a reliable detector that offers excellent value for money.
Personal Experience
I have Personally used this detector. It gives you a good depth into the ground. it is a very strong detector it doesn’t matter if dropped it is made of good quality it also gives you a good drop. Also gives you warranty. Initially it gives you little problem to operate but once you get the hang of it then it becomes very easy. for you first I learned it my self and then it It is very easy to use and Good metal detector on the ground.

Reviews
There are no reviews yet.